
Convert an Eagle LED nightlight
 Alan W
If some gentle and reassuring illumination through the night is needed, say in a hallway or kid’s bedroom, or on a landing, then until a while ago you used either a simple neon plug which glowed orange continuously, or a dusk-to-dawn nightlight powering a 7W mains bulb (such as the Eagle F318D shown).
;) Eagle-brand F318D is typical of plug-in dusk to dawn nightlights that use a 7W mains bulbNeon bulbs are low power and will last 20,000 hours or so, giving a warm amber glow. Those 7W bulbs in the dusk-to-dawn type can cost more in electricity over 12 months than the price of the nightlight itself – plus there’s the cost of bulbs. You can still buy them. Confusingly, some early ones used 12mm (E12) screw-threaded 7W bulbs instead of the common 14mm (E14) type. At one time I obsessed on finding a 12mm/14mm SES reducer, so I could use either size bulb (true!).
Eagle-brand F318D is typical of plug-in dusk to dawn nightlights that use a 7W mains bulbNeon bulbs are low power and will last 20,000 hours or so, giving a warm amber glow. Those 7W bulbs in the dusk-to-dawn type can cost more in electricity over 12 months than the price of the nightlight itself – plus there’s the cost of bulbs. You can still buy them. Confusingly, some early ones used 12mm (E12) screw-threaded 7W bulbs instead of the common 14mm (E14) type. At one time I obsessed on finding a 12mm/14mm SES reducer, so I could use either size bulb (true!).
Modern LED-powered nightlights offer a safer, reliable and cheap-to-run way of creating a night-time background glow. They're readily available from the usual sources and retailers. Most of them turn on at night, some change colour or some have selectable colours instead. Some fancier ones have remote-control or are even semi-‘smart’ types, but many of these anonymous Chinese gadgets have received mixed customer reviews.
I found a couple of plug-in LED nightlights with a useful ‘through-socket’ allowing you to plug mains appliances into them. But there was a problem.....
;) Genuine Eagle LED nightlight has a rotary bezel to select LED colours, and a mains through-socket [click to see]One is branded ‘Eagle’ LED Nightlight Inc 13A Socket (Part No. E304CD) which has a switched rotary white bezel. Just click it round to change colour from Green, Blue or (Cool) White. It’s the one I’ll focus on here.
Genuine Eagle LED nightlight has a rotary bezel to select LED colours, and a mains through-socket [click to see]One is branded ‘Eagle’ LED Nightlight Inc 13A Socket (Part No. E304CD) which has a switched rotary white bezel. Just click it round to change colour from Green, Blue or (Cool) White. It’s the one I’ll focus on here.
The Eagle LED Nightlight is well made and works perfectly, though I’m not sure if I’d want to run a 3,000W heater through one for very long. The main problem for me was the colours: blue and green are ‘cold’ and even the white was a cool shade too, creating a stark ambience. I couldn’t understand why warmer colours like neon orange or pink weren’t chosen instead.
So for this project I decided to change the colour schemes to something warmer and more reassuring, eg orange (amber) and pink. It means replacing the internal LEDs themselves which is something any electronics hobbyist can tackle, as I'll show.
Eagle LED Nightlight teardown
;) Remove two recessed Y-screws to separate the two halves [click to see]The Eagle E304CD nightlight is held together with two deeply-recessed Y-type (or tri-wing) screws intended to defeat people like me. (They failed ;) I had a long-reach Y-screw driver set, or you could try finding a Y3 or Y4 (= 3mm or 4mm dia.) long-reach tri-wing screwdriver. Ordinary stubby hex Y-driver security bits designed for eg electric screwdrivers probably won’t reach, and without a long-reach tri-wing screwdriver, you'll struggle to open it.
Remove two recessed Y-screws to separate the two halves [click to see]The Eagle E304CD nightlight is held together with two deeply-recessed Y-type (or tri-wing) screws intended to defeat people like me. (They failed ;) I had a long-reach Y-screw driver set, or you could try finding a Y3 or Y4 (= 3mm or 4mm dia.) long-reach tri-wing screwdriver. Ordinary stubby hex Y-driver security bits designed for eg electric screwdrivers probably won’t reach, and without a long-reach tri-wing screwdriver, you'll struggle to open it.
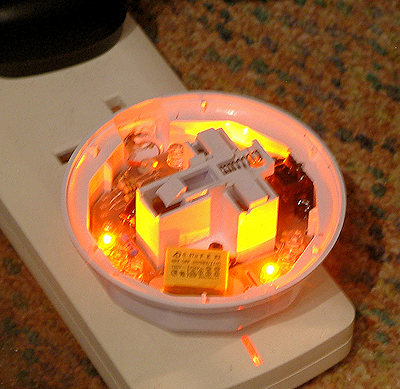
The two halves separate easily and the PCB can be eased out a little.
;) The PCB lifts out slightly, just enough to desolder the LEDs
The PCB lifts out slightly, just enough to desolder the LEDs;) Silkscreen print clearly shows the LED polarity (underneath)Silk-screen printing on the PCB clearly showed the LED orientation on the board. One my first one, the blue and green colours were swapped for orange and (dimmer) warm white, giving me a choice of white brightness.
Silkscreen print clearly shows the LED polarity (underneath)Silk-screen printing on the PCB clearly showed the LED orientation on the board. One my first one, the blue and green colours were swapped for orange and (dimmer) warm white, giving me a choice of white brightness.
On a second Eagle nightlight, I fitted orange and pink LEDs instead. These are the PCB LED designations:
W: LEDs 1/2/3 (cool white) - retained.
B: LEDs 4/5/6 (blue) - swapped for warm white or pink LEDs
G: LEDs 7/8/9 (green) - swapped for orange.
Replacement LEDs are 5mm water clear types, sometimes called ‘top hat’ or straw hat’ as they have low-profile flat tops. It was slightly fiddly to desolder them with braid and a desoldering pump. It’s easy to identify the pinouts of clear LEDs – the cathode is the ‘cup’ or reflector, the bigger of the two electrodes inside the LED. My source of LEDs was Bright Components.
;) An LED interior: the Cathode (LEFT) is the reflector cup ©AW.comReassembly is simple, but ensure the slide switch is correctly aligned with the bezel.
An LED interior: the Cathode (LEFT) is the reflector cup ©AW.comReassembly is simple, but ensure the slide switch is correctly aligned with the bezel.
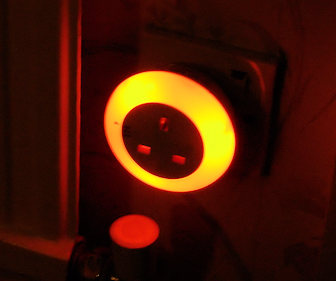 Eagle LED nightlight converted to orange
 ... and warm white...
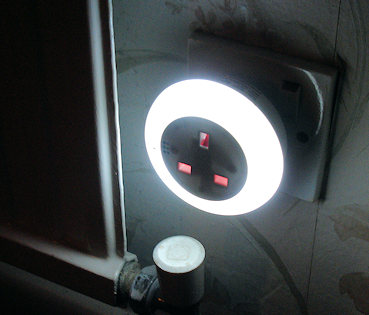 Compare with the original harsh cool white.
I use the orange colour setting most of all. Beware of imitators: the genuine Eagle one has a branded label plus switch markings ‘GBW’ on the bezel. There is a lot of 'bait and switch' marketing online with Eagle ones being shown but substitutes being shipped, especially through eBay and Amazon.
Another type I found was branded ‘Lyyt’ (Part No. 429.955) which used a touch-sensitive colour changer. It has since been discontinued. However I half-suspect it's the same as this EmotionLite brand on Amazon which has green, blue and (ta-da) warm white colours, so I suggest you keep warm white and swap the others for orange and pink.
The identical-looking Lyyt brand is held together with a two-prong security screw. I made a driver by using a Dremel to cut a slot out of a cheap flat-blade screwdriver. The unit was a bit fiddlier than the Eagle one to work with but the PCB is again clearly marked. The dusk-dawn photocell was glued with sealant which came out in one lump.
;) Touch-operated LED nightlight opened up [click to see]
Touch-operated LED nightlight opened up [click to see]
I successfully swapped out the LED colours and it worked fine. Here it is with the front bezel removed:
 Touch-control LED nightlight, now with orange LEDs
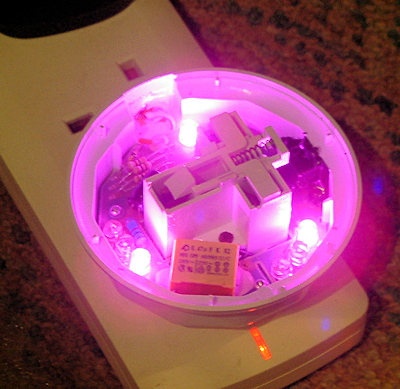 ... and pink
Try to find the genuine Eagle one which is a bit easier to work with though.
- If you’ve never soldered before, try my full colour book The Basic Soldering Guide available on Amazon. No prior knowledge is assumed and it teaches you all the techniques you need to know to get started with soldering and desoldering basic electronic parts for the first time.
- The Eagle brand now belongs to Electrovision Ltd. and is a name I recall back to the mid 1970s at least. I hope to expand on this legacy brand name in the future.

Reader Comments